My $4/month self-hosted web server setup

This blog documented my setup for self-hosting a web server. Hopefully this is helpful for others to get started with hosting your web server. I was intimated by all the potential cost and complexity before, but after all, it was not that complicated.
It starts from renting a virtual machine and setting the machine up, to running my web servers in containers, setting DNS records, running Nginx and monitoring tools. All cost me on average less than $4 a month. Including the cost of renting my own domain, it is still less than $5 per month on average.
It gave me a lot of fun to tinker with things. It allows me to host more than 1 web server on the same machine using nginx. I would like to share the steps, thought process and learnings in details.
Overview
Last year, I created my playground. It is a web server that power real time, turn-based multiplayer game. The major difference it has with all the tools I built before was it needs a server. Unlike this Wiki, the content and service it provides are not static. It cannot be hosted as a static site on GitHub Pages for free. To synchronize and power real time multiplayer, I need a server on the Internet that is always up that clients can connect to.
Why I chose self-hosting
There are multiple ways to do this. With platform as a service or similar cloud services model, I could just use the right platform to host. It should be easier to set up and configure, with less overhead and initial cost. However, because it is just a hobby project, the stakes are low. I think it is worth to figure out how to self-host.
Self-hosting allows me to tinker with networking, containers, server management, and more. By having a machine running, it also opens the possibility to host more than 1 web services on it. I started with hosting the playground server, soon added my own plausible analytics server, an error tracking server called glitchtip, and more. All running on this small machine in the data center. There is no additional cost for each new server I add to the server.
The server with just 2 vCPUs and 4 GB of RAM, with 20 TB traffic included, is able to power a lot of services. The server itself cost less than $4 a month. Considering, Plausible cloud service cost $9 a month, and most cloud providers' web services with much tinier machine still cost a few dollars a month. Self-hosting is a great deal.
This guide includes my notes and thought process while researching and setting up things. It started from purchasing my own domain. Then, researching and deciding to rent a virtual machine from Hetzner, configure it and setting it up. Running my web server in a container in the VM. All the configurations required to route traffic to the web server and finally monitoring tools for the server.
Architecture Overview
Before I go over the setup step by step, it would be great to go over the major components in the setup and some terminologies so that we are aligned.
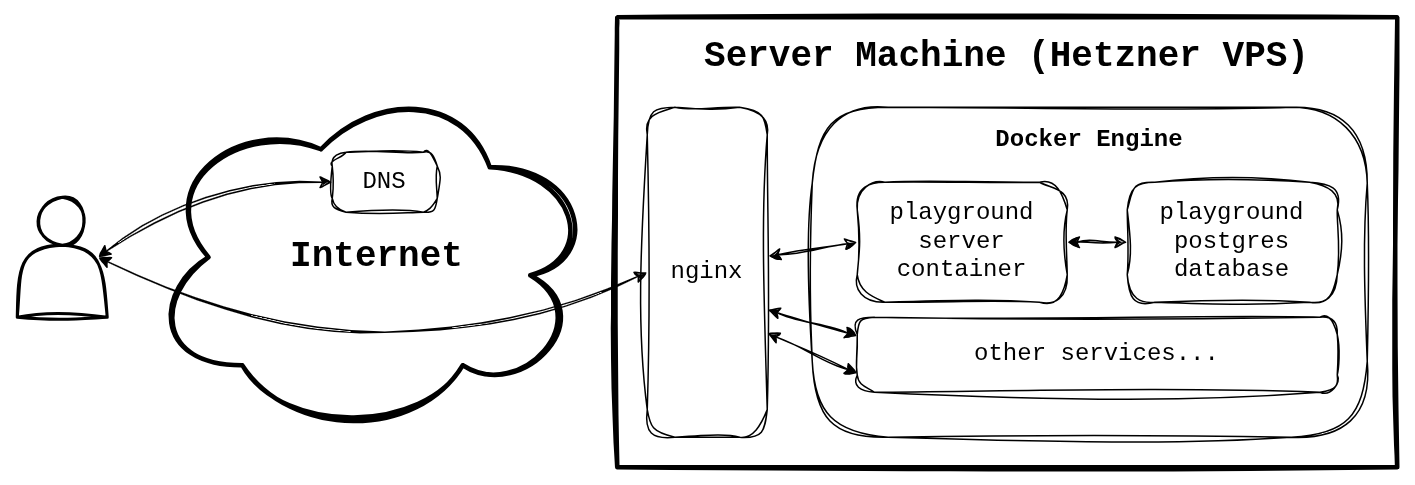
When user request for playground.ethanppl.com, what happens is your computer
need to know where that is hosted. It sends a domain name system (DNS) query to
DNS servers to ask for the IP address for the playground.ethanppl.com domain.
Once it gets the IP address, it sends a request to this IP address at port 80 to
get the web page. This guide will go through how to configure and set up your
domain and DNS. For more about how the Internet work I suggest checking out
The Internet, Explained from First Principle
or other resources in the Computer Network Page in
this Wiki.
From here, the definition of the "server" can get a bit confusing. There are multiple web servers supporting multiple services that can be run on the same server machine. It is like your computer can run different apps, process, servers on the same machine. We can run multiple web servers on the same machine.
Requests coming from the Internet reach our IP address. The computer listening to these requests is the server. I hosted this server on Hetzner, a cloud provider providing cheap virtual machines and the IP addresses. This virtual private server (VPS) is like a normal computer that is accessible from the Internet. In this guide, I will refer to this server as the virtual machine (VM), the server machine, or just the Hetzner VPS. I will explain why I chose Hetzner and how to set it up below.
Within the server machine, all incoming requests go through
nginx, a reverse proxy running natively on the
virtual machine. A
reverse proxy
is like a server sitting in front of our real server, relaying messages between
the clients and the server. Nginx looks at what servers you are requesting, in
this case playground.ethanppl.com, and route this to the corresponding service
that are handling these requests. Say another request is going to
plausible.ethanppl.com, nginx will route this to a separate service. Nginx is
the magic that allow us to run multiple web services on the same server machine.
It is also responsible for supporting HTTP2, HTTP3 and HTTPS. All explained
below.
All the web services on the server are running in containers. It provides an isolated way to run these services without them intervening each other. The containers are the actual "web servers" that are providing the service. I will also explain how I ran the database that the playground web server use in a container, and how to set up docker volumes and network for this local database.
It is OK if all the terminologies sounds a lot. I will explain in details below. All you need to be aware of right now is the difference between the server machine and the web servers. I will first talk about the server machine hosted on Hetzner, then how to run containers in the server machine, and lastly configure Nginx and wiring things up.
Terminologies:
- DNS: translates domain name to IP address
- Server machine:
- A web server rent from Hetzner running in a data center in Finland
- Also referenced as the Hetzner VPS, or the virtual machine
- nginx:
- A reverse proxy server in front of the real web server
- Handle piping the traffic to the right server based on the domain requesting
- Handle HTTPS, HTTP2 and HTTP3
- Containers: the actual web servers
This blog turns out to be longer than I initially thought. However, I do not want this to be intimidating for people who want to try self-hosting. Instead, I would like to write down all my thought process and things I learned along the way to help anyone hesitate to start.
This document is structured as if you were following along self-hosting your own Playground server. There are notes for some key steps and concepts. I wish this document is something I could read beforehand, telling me self-hosting is not that hard and not that expensive!
If you are ready, let's start from the first thing I did, getting a domain name.
Register a Domain
When I decided to self-host my server, the first thing I did is to purchase my
own ethanppl.com domain. If you have a domain, you can skip forward to
renting a Hetzner VPS.
Registering a domain technically is not related to self-hosting. It is not required to run a server. It is possible to directly connect to the server over the Internet with IP address and port number. However, having a hostname is easier to visit, share, or get a certificate for HTTPS.
There are many domain registrars. I got mine from Cloudflare. It is cheap and easy to set up. I got my domain for 2 years with less than 20 USD. Cloudflare provides free whois protection, DNSSEC, email routing, etc. by default. I have heard that Namecheap and Porkbun both works well with the developer community. You can read this article from the Pragmatic Engineer for more.
Renting a Hetzner VPS
To self-host, you need a server. The server is just a computer that runs 24 hours and connected to the Internet.
Where to host
You could use a machine you have or use a cloud provider. The difference is whether you manage the physical metal machine, networking, electricity and operating system, or pay a cloud provider to handle that. I considered hosting with a machine at home, but I chose to rent a VM from a cloud provider in the end.
I have an old laptop sitting next to me unused, or I could buy a Raspberry Pi. The benefit is there will be no ongoing cloud subscription fee to rent a VM. For a cheaper price, I get better performance. It allows me to learn more, figure out more details and understanding more on bare metal operating systems and servers. The latency for me to connect to the service I host is also extremely low as it sits next to me.
One of the bigger hurdles to use a machine at home is to ensure a stable IP address for this machine to be reachable over the Internet. But for most home address, the IP address might be dynamic, or go through network address translation which makes it impossible to have a stable IP address. One possible solution is ddclient, which periodically update the DNS record for you with the dynamically changing IP address. It works with all major DNS and domain registrars including Cloudflare, Namecheap and Porkbun.
Also, there are greater risk in terms of privacy and security concerns. If I messed up, I am not exposing a VM in a datacenter but a computer in my home network. It is also going to consume electricity and network bandwidth of my home network. In the end, considering the risk and effort required, I decided to rent a cloud VM.
Out of all the options I can find online, the cheapest is renting a Hetzner VM. I chose the cheapest model I can find, CX22 machine in Helsinki, Finland. It provides 2 vCPUs, 4 GB of RAM, 40 GB of storage and 20 TB of bandwidth per month. The server and a IPv4 address combined cost €3.79 each month. It is cheaper compare to all other providers with the same specs, and it is more than what I need. With this, there are a lot I can do with it.
The biggest drawback for me is it is hosted in Finland, the roundtrip from Hong Kong to Finland takes time. I searched online on the typical latency and also tested it after rending, it is around 0.1 to 0.3 seconds. It is definitely noticeable, but not deal-breaking for me considering the price. Hetzner started to offer servers in Singapore, but with 2 to 3 times the price. I chose Finland instead.
If you would like to try Hetzner, here is my referral link for Hetzner. You may receive free credits upon sign-up.
Renting on Hetzner instead of local machine because:
- Still very cheap
- No need to handle problems with dynamic IP address
- Lower privacy and security risk
- Hardware maintenance is taken care by Hetzner
- Electricity and network cost is also handled by Hetzner
Hetzner Server Setup
If you decided to host on another cloud machine, similar set of settings should apply. Make sure you can connect to it over SSH, and it is accessible over the Internet. After that, you may skip forward to SSH configuration tips and running the web server in Docker.
To rent a Hetzner VPS, create an account in Hetzner Cloud. There might be a few verifications steps involved to prevent abuse. Once the account is active, you can rent a server. Hetzner has a comprehensive guide on how to create a server.
I tried to keep my server specs closer to what I have on my laptop. I tried an Arm chip at first, but there were minor inconveniences I faced because of slightly different versions, API or support on various stuff. It is frustrating because I know the issue, but I cannot reproduce and test the fix locally. In the end, I went back to Amd x86 chip, same as my laptop used for development.
My configuration are:
- Location: Helsinki
- After considering latency and pricing, this works for me
- Image: Ubuntu
- Just because I use Ubuntu locally as well
- Typed: Shared CPU x86 (Intel/AMD)
- I am not doing intensive or sensitive stuff, shared CPU is fine
- I chose x86 because I am running on an x86 laptop as well
- Networking: IPv4 and IPv6
- IPv4: My network is only IPv4, saves me a lot of hassle by having a IPv4
- IPv6: It is free of charge so why not
- SSH keys: Create a pair and save the keys locally, use later to SSH into the machine
- Volumes: No, I did not create one.
- Firewall: No, I did not create one.
- Backups: No, I did not enable it.
- Placement groups: No, irrelevant as I only have 1 server
- Labels: Whatever you like, I did not add any as I only have 1 server
- Cloud config: See below
Cloud configuration is a set initialization configuration for newly created servers. Hetzner Community has a guide for it and I used a very similar config.
The few important things it set up are:
fail2ban: To prevent brute force attacks on the SSH authenticationufw: firewall to only allow required ports- Harden SSH configs like deactivating password authentication
I suggest read the Hetzner guide and the manual for these programs. It is worth to understand the suggested security practice. Tweak it according to what you would like. Remember to change the user's name to your name.
SSH Connection
To connect to the server, you need to SSH into the machine. SSH provides a way to connect your computer to the server computer with the terminal. It is like directly accessing the terminal of the server over the Internet, securely. Hetzner documentation has a guide as well.
To connect to a server, you run an ssh command:
ssh -i /path/to/private_key username@<ip_address>
- The
-ioption for the identity file, provide the ssh private key file - The username is the name set in the cloud init configuration above
- The IP address is the address you rent, shown on the Hetzner dashboard
If your cloud init config changed the port to 2222, then
ssh -i /path/to/private_key -p 2222 username@<ip_address>
For the first time, you will most likely be prompted if you want to connect to
the host. By default, confirming will save this host to ~/.ssh/known_hosts,
and you will not see this warning again. Once successfully ran the command, you
should see output like this:
Welcome to Ubuntu 24.04 LTS (GNU/Linux 6.8.0-40-generic x86_64)

 * Documentation:  https://help.ubuntu.com
 * Management:     https://landscape.canonical.com
 * Support:        https://ubuntu.com/pro

 System information as of Sat Apr 19 03:35:28 PM UTC 2025

  System load:  0.37               Processes:             223
  Usage of /:   58.7% of 37.23GB   Users logged in:       0
  Memory usage: 55%                IPv4 address for eth0: 100.100.100.100
  Swap usage:   0%                 IPv6 address for eth0: aaaa:bbbb:cccc:dddd::1
Running the command exit or pressing Ctrl + D will close the connection.
There is one additional step I did to improve the workflow. Instead of typing
out the command and IP address out every time, you can set up an SSH config in
~/.ssh/config. Here is my config for my server:
Host playground
  HostName 100.100.100.100
  User ethan
  IdentityFile ~/.ssh/hetzner_personal
- The host
playgroundcan be any name you choose. - Hostname is the IP address of your server machine
- User is the login username
- Identity file is the file to the private key
With this configuration saved, connecting to the server is simply running
ssh playground.
Set up server
- Choose suitable architecture and OS
- Basic firewall and SSH configurations for security measures
- Create an SSH config in
~/.ssh/configlocally for easier access
Running the Web Server
With the server machine all set up, next is to run the playground web server and
the database on this machine. I chose running the app and the database in docker
for easier management. If you run it in other ways, you can skip this session,
make the app run on the server, and skip ahead to the
configuring DNS,
configuring firewall with ufw, and
configuring reverse proxy server nginx
section.
Why Docker?
There are several ways to run a server. You may run it as a process on the machine directly. This should be the simplest to get started. You can even run the server the same way as how you are running it locally. However, it will get harder when managing versions of the apps and getting the runtime right. For example, my playground is an elixir server. If I want to update the Elixir or Erlang version, I need to make sure the same version is properly installed on the server machine as well. If I have another web server running on the same machine that needs another version of Elixir then I need to install some other virtual environment or shimming tools on the server as well. And if I ever want to have more than one machine running the same app, then I need to update every single machine to the same versions.
I am probably still far from all these scaling issues, but there is nothing stopping me from preemptively think about scaling issues. It gets harder to manage when more things are involved, if there is no isolation. To solve all the above issues, the most common solution is running apps in containers.
If you do not know what containers are, you can think of them as a box that provide a mini computer environment for the things running inside. And this box is completely isolated from other boxes or the world outside the box. The box is lightweight, which means it is easy to create, start, stop or destroy, with lower overhead compare to virtual machines. Furthermore, they are "standardized" like shipping containers. The same containers can be run in different environment (Windows, Mac, Linux, etc.) with the docker engine installed. Any code in any tech stack can be run within a container, just like any things can be shipped on any cargo vessels, as long as they fit in the standardized shipping containers. It solves the issue where an app need to build a native version for every runtime environment.
The overall flow for me to deploy playground right now is not very optimized, but works for me. Plus, I do not deploy frequently. I will go through them in details below, but this is the higher level:
- Push code to GitHub and tag the commit I want to deploy
- Pull code from the Hetzner VPS and checkout the tag
- Build a new image in the VPS
- Stop and then remove the old container
- Start the new container
There are other tools and services to allow easier deployment, like Coolify. You may find these useful if you are not comfortable working with docker and nginx directly, or want to make the process more optimize.
Pull Code
First, I need to make sure my Hetzner VPS and my local machine have the same code. And the easiest way for me to copy them over is to push that code to GitHub, then pull the same commit from GitHub.
I chose not to use a docker repository, where I would need to first push a docker image for the new version, and then pull that image and run it. I already have a code repository. I can directly build the docker image with the source code in the server machine. Because it is just docker build, I do not need any runtime and binary either. I only need to SSH into the VPS and run a script.
If you are able to push code to GitHub, I think you know how to pull code from GitHub. The only difference, maybe, is to get familiar with the git CLI, if you are used to Git with a GUI. The CLI is not that complicate for basic pull and checkout. I have some more resources in the Git page of this Wiki. Generate a new pair of SSH keys in the Hetzner VM and add it to your GitHub account should make every thing works.
Building the Server Image
With Git set up, next is to install docker. Docker allow us to build the images and run those images in containers. There are detailed documentation on how to install docker, and here is the one for Ubuntu. One thing to pay attention for Linux is there are post-installation steps to manage user roles and permissions.
To run the app in a container, we need to build an image for it to run on. A docker image contains the code and data needed for the container to run. The instructions for building a docker image are specified in a docker file.
I will not go into the specific details of setting up the Elixir build environment and run time in this post, that will most likely be different from what you need if you are not running an Elixir app. You will need to write your own docker file or copy some templates for your tech stack. You can find the docker file for my playground app in the GitHub repository for reference.
Docker image can be based on top of other docker images. For example, alpine is a lightweight Linux image to be based on. Which image to use depends on what apps you are running, there should be plenty of guides on how to build a docker image for the tech stack that you are running on. For the playground app, since we are running an Elixir app, the base image is based on the elixir docker image.
To test the docker file, you can build it locally and run the container locally to see if it works as expected. This is also why I set up my server environment closer to my local machine. It is easier to build and debug the image locally, while having a higher likelihood all should still work on the server machine.
So, build the docker image at the root of the repository, where the Dockerfile
is. I like to tag the output image (-t playground), so it is easier to
reference later:
docker buildx build -t playground .
Building a docker image for the web server
- Docker containers for isolation and easier deployment
- Write and test building the docker image locally
- Pull code from git and build the container image in the server machine
Running the Postgres Container
My server depends on a Postgres database. I ran this database also inside a container, with docker volume and custom bridge network set up. If you do not need a database, you may skip this section.
Again, I can run the Postgres database natively or as a docker container. I chose running it in a docker container for the benefit of isolation. I knew I will run other services on the same machine that also need separate Postgres databases. Having them isolated make things easier to control.
Docker volumes and networking are the two important things to consider when running a database in a container.
Docker Volume
First, when the database container is stopped or destroyed, we want to persist its data. Otherwise, it's not a database. Docker volume is a great way to do that. Volumes are managed by docker and the data will be preserved even the container is stopped or destroyed. Volume is the preferred way to store and retrieve data in a container.
First, create a volume to be used later:
docker volume create pgdata
Docker Network
Second, as mentioned, containers are isolated. The playground app running in a container by default cannot connect to the Postgres database running in another container. There are generally two approaches to solve this issue, expose the container to the host network or create a user-defined docker network to connect the two containers.
Exposing to the host network means the container will share the host's network.
For example, if the Postgres container is exposing the 5432 port to the host
network, inside the machine, accessing localhost:5432 will be the docker
container. The advantage is this is easier to set up, just add the
--network=host flag, but then there is no isolation. Generally, any process
that can access localhost will be able to access the localhost will be able to
access the container. It is also impossible for two different Postgres
containers to share the same localhost 5432 port.
On the other hand, docker allows creating user-defined network. The default network driver is called bridge network. In simple terms, defining a custom bridge network creates a bridge between the containers to communicate with each other. This solves what we need while maintaining the same isolation. Containers can also be attached and detached from the bridge networks on the fly.
To create a network to be used later:
docker network create playgroundNetwork
Running the Database
It takes one line to run the Postgres container
docker run
  --name postgres
  --env=POSTGRES_PASSWORD=ReplaceMe
  --env=POSTGRES_DB=playground_engine
  -v pgdata:/var/lib/postgresql/data
  -d
  postgres
- The name
of the container will be
postgres - The two
ENV variables
- The password for the superuser
postgres - The default database name
- There are more ENV variables available to configure
- The password for the superuser
- Use the
pgdatavolume created earlier and mount that to the/var/lib/postgresql/datapath inside the container -dto detach the container process from the terminal window, otherwise closing the terminal will stop the container- And finally
postgresis the name of the image, which you can find on docker hub
Verify the Database is Running
Once connected, we can use psql to verify the database is up and running.
Because we did not expose the Postgres container to the host network, we cannot
connect to it with localhost:5432. Instead, we run the command inside the
container with
docker exec:
docker exec -it postgres psql -U postgres -d playground_engine
If you are prompted to input your password. Input the same password set above in
the POSTGRES_PASSWORD ENV variable. If connected successfully, it means the
database is running well.
In my playground deployment notes, you will find lines where I set up DB roles and privileges. They are just practices. Normally for a side project database there is no such need either. I mainly referenced Securing your PostgreSQL DB with Roles & Privileges to build these commands for creating roles and granting privileges.
With all that set, exit the psql session and back to the host machine, we add
the Postgres container to the network created earlier:
docker network connect playgroundNetwork postgres
Then, inspect the network to get the IP address of the Postgres container.
docker network inspect playgroundNetwork
There should be something like 127.18.0.2. Save it. It will be useful later to connect the playground container to the database.
Running the Server Container
Then, we can deploy the Playground container. There are playground specific commands that is used because of Elixir Phoenix framework. Your server with a different tech stack will most likely require different ENVs. For example, Phoenix framework provide a deployment guide. You may be able to find similar documentation.
For playground, this docker run command is used:
docker run --name playground \
  --network=playgroundNetwork \
  --env=DATABASE_URL="postgresql://playground_backend:password@172.18.0.2:5432/playground_engine" \
  --env=MIGRATION_DATABASE_URL="postgresql://playground_migrations:password@172.18.0.2:5432/playground_engine" \
  --env=SECRET_KEY_BASE="secret" \
  --env=PHX_HOST="playground.ethanppl.com" \
  --env=ENV="production" \
  --env=SENTRY_DSN="https://sentry.ethanppl.com" \
  -p 4000:4000 \
  -d
  playground
- Name this container as
playground - The network is the
playgroundNetworkcreated earlier - Change the database role, password, IP address, and database name accordingly
- I have a separate role and user for schema migration, so a different
MIGRATION_DATABASE_URL - Set the
SECRET_KEY_BASEto a secret generated frommix phx.gen.secret - Set the
PHX_HOSTto the domain name being used - Set the
ENVto production - The
SENTRY_DSNis optional to track errors - Expose port 4000
-dto detach the process- Run the
playgroundimage
Once ran, you should be able to confirm the container is running with
docker ps
You should be able to see the playground container is up and running.
Check the logs in the container to confirm it can connect to the database:
docker logs playground
If the app cannot connect to the database, double-check the IP address and port.
As a tip, you can spin up a small container with the
alpine image, add this small container to
the same network with the database, and you can use
docker exec to
debug and see if it can connect to the database in the network. If it works,
then the database and docker network is working, it's the configuration or the
playground server problem. If it does not, then maybe the database is not
running, or the docker bridge network is not working.
Getting everything running in docker:
- Also run the Postgres database in container
- Use docker volume to persist the database storage
- Use docker network to allow connections between the web server container and the database container
- Run the container with the right environment variables
Configuring DNS
Domain name system (DNS) allows anyone on the Internet to use
playground.ethanppl.com to find the IP address of the server hosting it, and
route request there.
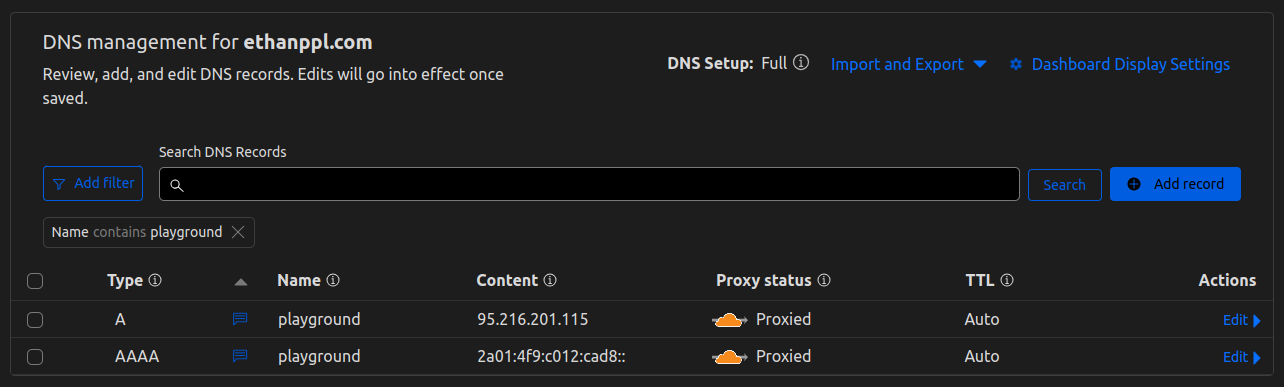
I used Cloudflare to purchase my ethanppl.com domain, so logically I use their
DNS service. Their DNS service is free of charge.
To point playground.ethanppl.com to the Hetzner VPS, we will need to set up an
A record for the IPv4 address and an AAAA record for the IPv6 address. The
name of both records is playground. The content is the IPv4 and IPv6 address,
respectively. I set the proxy status to true for both, but false also works.
Keep the time to live (TTL) as auto, which by default is 5 minutes.
If proxy is enabled, Cloudflare will expose their server IP address, and internally route traffic to the Hetzner VPS. It automatically offers some optimization, caching and protection. Read more in Cloudflare documentation.
Later, we will require HTTPS for the domain. If proxy is enabled, we need to change the encryption mode from "Flexible" to "Full" or "Full (Strict)" in the SSL/TLS page. By default, Cloudflare use "Flexible" mode which send request in HTTP. If the server automatically redirects HTTP request to HTTPS requests, and Cloudflare forward that request as HTTP, creating an infinite redirect loop. Change the encryption mode so that Cloudflare send request as HTTPS. Read more about this problem in Cloudflare documentation.
DNS:
Arecord for IPv4 andAAAAfor IPv6- If proxy with Cloudflare and requiring HTTPS later, change encryption mode in Cloudflare to "Full" or "Full (Strict)"
Configure firewall (ufw)
With DNS set up, we can configure the server to listen to the traffic from the Internet.
Check the firewall setting in ufw to make sure our app can listen to web
server traffic.
sudo ufw status
Some of the commands that might be helpful
sudo ufw show user-rules: display information of the running firewallsudo ufw status verbose: show configsudo ufw enable: enable ufwsudo ufw default deny incoming: by default disallow all incoming traffic from the Internet to the machinesudo ufw default allow outgoing: by default allow all outgoing traffic from the machine to the Internetsudo ufw allow OpenSSH: allow SSH, this is important, otherwise will not be able to SSH insudo ufw allow http: allow HTTPsudo ufw allow https: allow HTTPSsudo ufw allow in on docker0 from 192.168.1.0/24: open ufw to docker for local networksudo ufw allow in on docker0 from 10.8.0.0/24: open ufw to docker for local networksudo ufw allow in on docker0 from 172.20.0.0/16: open ufw to docker for local docker subnetsudo ufw allow 51820/udp: allow UDP on port 51820 (this is not useful for playground but for the wireguard server I have)
Here is the configuration I have
To                         Action      From
--                         ------      ----
OpenSSH                    ALLOW       Anywhere
80/tcp                     ALLOW       Anywhere
443                        ALLOW       Anywhere
Anywhere on docker0        ALLOW       192.168.1.0/24
Anywhere on docker0        ALLOW       10.8.0.0/24
Anywhere on docker0        ALLOW       172.20.0.0/16
51820/udp                  ALLOW       Anywhere
OpenSSH (v6)               ALLOW       Anywhere (v6)
80/tcp (v6)                ALLOW       Anywhere (v6)
443 (v6)                   ALLOW       Anywhere (v6)
51820/udp (v6)             ALLOW       Anywhere (v6)
Firewall
- Allow SSH and HTTP connections
- Disallow traffic into other ports
Configure reverse proxy server (nginx)
Nginx is a lightweight server running on the machine. It makes it easy to host
multiple domains on the same server. It can route the incoming traffic from the
Internet to the right server running on the machine based on the domain name.
For example, anyone on the internet trying to talk to playground.ethanppl.com
will be routed to the docker container running at port 4000 locally.
There are a lot more features supported by nginx, you may explore them on their documentation. The first thing is to get it up and running.
Basics
Install nginx first. Here is the doc for installing on Ubuntu.
Start the nginx server:
sudo systemctl start nginx
The configurations are stored in the /etc/nginx directory.
cd /etc/nginx
You should find a /etc/nginx/nginx.conf file with some default configurations.
You may add new configurations in the nginx.conf file directly to test. But
for better organization, I find it better to create a separate config file for
each server and include them in the main nginx.conf. For me, the default
configuration already includes a line of include /etc/nginx/conf.d/*.conf; in
the http block. Adding a new *.conf file inside the /etc/nginx/conf.d
directory will work.
Create a new file playground.conf file in /etc/nginx/conf.d. The file name
does not matter, you can change it however you want.
Add the following config:
server {
   listen 80;

   # Change this
   server_name playground.ethanppl.com;

   location / {
      proxy_pass http://localhost:4000;
      proxy_ssl_server_name on;

      # For web socket connections
      proxy_http_version 1.1;
      proxy_set_header Upgrade $http_upgrade;
      proxy_set_header Connection "Upgrade";
   }
}
Change the server_name directive to the domain name of your web server. The
server_name directive is what nginx use to determine where to route the
traffic. In the above configuration, anything requesting to
playground.ethanppl.com will go to localhost:4000.
If you are running the playground server, or anything requires web socket, the three lines for setting header and connection upgrade is required. It allows upgrading an HTTP connection to a WebSocket connection. Read more about it in MDN docs and explanation on setting up WebSocket proxying in nginx.
If your site contains requirements for other communication protocol, worth checking nginx documentation to see if there are specific configurations needed. It is also a good way to learn how protocols run behind the scenes and what are involved underlying the connections.
Then, test that the nginx configurations are valid.
sudo nginx -t
If all goes well, you should see the following lines being printed:
nginx: the configuration file /etc/nginx/nginx.conf syntax is ok
nginx: configuration file /etc/nginx/nginx.conf test is successful
Otherwise, follow the instructions printed to fix the configuration. It should tell you where are the invalid value on which directive.
Once all good, reload the nginx server:
sudo nginx -s reload
HTTPS
HTTPS is almost compulsory nowadays. Some default browser settings would prevent users from accessing a site without HTTPS. I would like to share my site with people without them clicking "Proceed (unsafe)". Able to set up HTTPS for self-hosted site is a must for me.
Fortunately, there are free service providing signing and issuing certificate for HTTPS. Let's Encrypt is a free certificate authority service by a nonprofit organization. In fact, some major static site hosting on cloud providers like Render all uses Let's Encrypt behind the scene to provide their automated SSL certificates.
Setting up the certificates are pretty easy. Here is the guide for using nginx on Ubuntu with Certbot. Certbot can get free certificates and set the corresponding nginx configurations automatically.
For other platforms and setup, check Let's Encrypt Getting Started documentation and Certbot help page.
Follow the instructions to install snap and use snap to install certbot. Run certbot and allow it to edit the nginx configurations directly.
sudo certbot --nginx
It will automatically find all the domains without certificates, create a
certificate and update the nginx configuration accordingly. Certbot provides a
certonly option to let you make the nginx configurations by hand. But in my
experience, the bot is good, and it does not mess up the nginx configurations.
Test that the configurations are all good: sudo nginx -t. And reload the
configurations again, sudo nginx -s reload.
Now you should be able to connect to the site with HTTPS!
If you inspect the configuration file, you will see that lines marked with
# managed by Certbot. It added port 443 for SSL connection, added the
ssl_certificate directive and some related configurations. It also added an
automatic redirect from HTTP to HTTPS. This is why we need to tell Cloudflare to
send request with HTTPS when proxy through Cloudflare. Otherwise, it enters a
redirect loop.
HTTP2 and HTTP3
HTTP2 and HTTP3 each has improvements over the application protocol to improve latency and reliability. Most of the time there should not be noticeable difference, especially our site is not demanding high bandwidth communication. You read more about HTTP2 and HTTP3 on the HTTP Page in this Wiki.
To enable HTTP2,
- Add
http2 onin the server configuration
To enable HTTP3,
- Add
http3 on - Add
listen 443 quic reuseportor justlisten 443 quic.- Notice that if there are multiple servers using the same IP address and port
in nginx, only one of them can do
reuseport.
- Notice that if there are multiple servers using the same IP address and port
in nginx, only one of them can do
- Add
add_header Alt-Svc 'h3=":443"; ma=86400'in the location block- This is a response header to let the browser know that another location (alternative service (Alt-Svc)) is available for servicing with HTTP3 (h3)
- The port used by
quicis recommended to be the same asssl, hence 443
The final configuration should look something like this:
server {
   server_name  playground.ethanppl.com;

   http2 on;
   http3 on;

   location / {
      proxy_pass http://localhost:4000;
      proxy_ssl_server_name on;

      # For web socket connections
      proxy_http_version 1.1;
      proxy_set_header Upgrade $http_upgrade;
      proxy_set_header Connection "Upgrade";

      add_header Alt-Svc 'h3=":443"; ma=86400';
   }

   listen 443 ssl; # managed by Certbot
   listen 443 quic reuseport;

   ssl_certificate /etc/letsencrypt/live/playground.ethanppl.com/fullchain.pem; # managed by Certbot
   ssl_certificate_key /etc/letsencrypt/live/playground.ethanppl.com/privkey.pem; # managed by Certbot
   include /etc/letsencrypt/options-ssl-nginx.conf; # managed by Certbot
   ssl_dhparam /etc/letsencrypt/ssl-dhparams.pem; # managed by Certbot

}

server {
   if ($host = playground.ethanppl.com) {
      return 301 https://$host$request_uri;
   } # managed by Certbot


   listen       80;
   server_name  playground.ethanppl.com;
   return 404; # managed by Certbot
}
Nginx
- Based on the
server_name, proxy the connection to the docker container - Use Let's Encrypt and certbot to get a certificate and configure HTTPS automatically
- Add relevant configuration to support HTTP2 and HTTP3 connections
Monitoring
I am not running mission-critical life savings web services, but it is still good to monitor what is going on in the server and alert me when things gone wrong. I found some monitoring services online that are free for hobby projects.
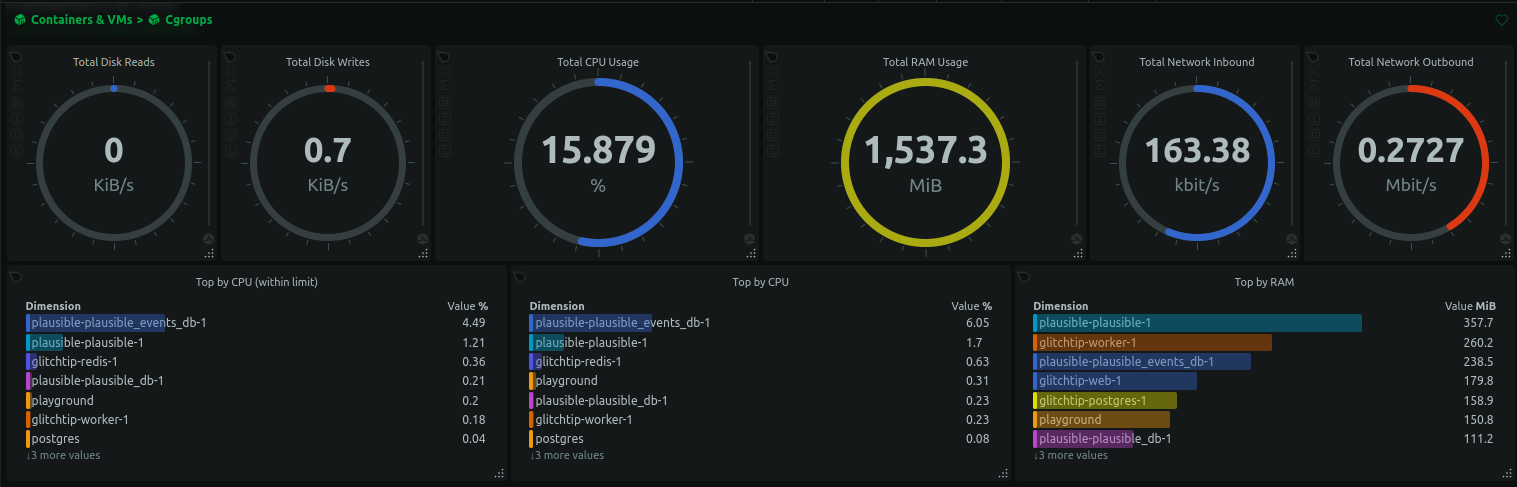
Netdata
I use Netdata for monitoring the Hetzner server and the containers. It has an agent to read the data and optionally upload to Netdata cloud server for some nice visualizations. It includes basics like CPU, memory, storage and network data for the host machine. Additionally, it can also show the load for each container running in the machine.
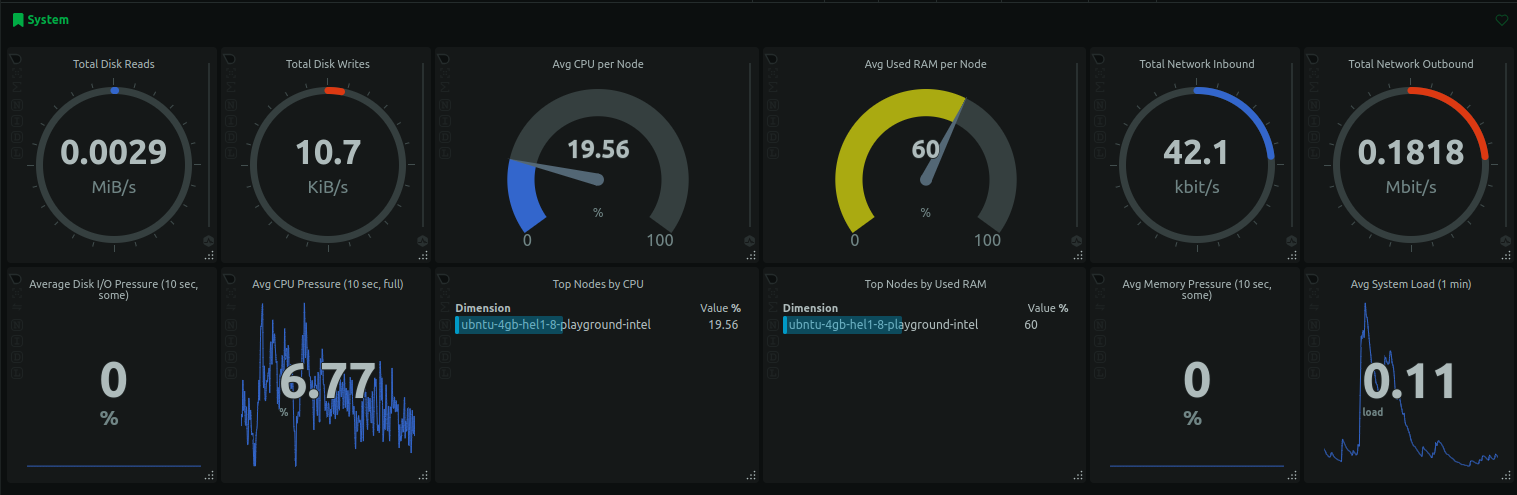
It works out of the box. Create an account on Netdata Cloud, follow the prompt to connect a node, pick Ubuntu and follow the instructions on screen to install the Netdata agent and all graphs worked. Email automations are automatically configured to notify when things went wrong. However, configuring the notifications rules requires subscribing to a paid plan.
If you would like to subscribe to Netdata, here is my invite link for 10% discount for the first year.
Checkly
Another tool I used for checking uptime and response time is Checkly. For free, there is a certain amount of API calls and browser per month. What I do is just for every 30 mins to 1 hour, call my self-hosted services and make sure they return status 200.
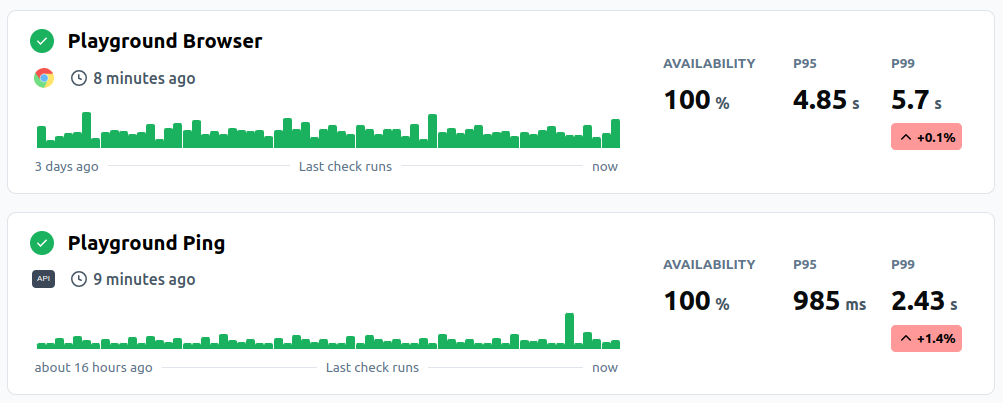
Checkly supports different location and interval to send the request. It also allows different assertions like text/json response, and verify the response meet certain requirements. I kept it simple to assert for status 200, but there are potential to configure it for more robust health checks.
Much More
Other than monitoring, there are a lot more to try and experiment. I added my own plausible analytics server, glitchtip error tracking server, and more. This blog is already long. I may write about them in the future. All in all, the machine is yours, and you can do whatever you want with it.
There are more to explore in the area of self-hosting. There are always more to
do with security. This blog covered the basics like SSH authentication with keys
instead of password, basic firewall set up with ufw and HTTPS for our server.
There are more to do like not SSH into as root user by default and running
containers in rootless environment.
Backup is also another important aspect for self-hosting. If you want to store anything important, always backup regularly. Follow the 3-2-1 backup rule, with 3 copies, 2 on different media types and 1 stored offsite. This is to prevent any potential catastrophic error, be it human error, or disk corrupted, electricity disruption, virus and malware.
Summary
This setup has been running for 9 months now, and it requires little maintenance. I had a lot of fun running my own server and figuring out stuff along the way.
This blog went through my thought process on choosing the server machine, running playground in docker, configuring database containers, DNS, nginx, firewall and monitoring tools. I believe it will be a never ending journey and I hope this inspires people to try too. I am not someone particularly interested in DevOps or server configurations, but this project gave me a better understanding of the problem space.
If you would like to explore more,
awesome-selfhosted
is a list of software services available for hosting, and
awesome-sysadmin is a list
of awesome open-source sysadmin resources.
References
Checkout self-hosting page for more.
My setup is closest to this blog:
- My self-hosted websites architecture
- OVH cloud, nginx reverse proxy, DNS & networking, external CDN for high traffic static sites
- Hosting websites, databases, plausible for analytics, sentry for error alerts, personal utils
- Handling security, monitoring, backup and disaster recovery
Other blogs:
- Self-hosting in 2023
(HN)
- Interesting read. Self-host a blog with Raspberry Pi, Coolify for deployment and DDClient to solve the problem of a dynamic IP
- Self-hosted is awesome
- Hetzner setup, docker applications, nginx host, cloudflare DNS
- Repurpose your old laptop into a home server
- Ubuntu server, install docker, run Plex and secure remote connection with tailscale
Other resources:
- awesome-selfhosted — List of web applications that can be self-hosted
- awesome-sysadmin — List of sysadmin resources
- r/selfhosted, r/HomeServer — Reddit sub
- slefh.st — Newsletter